This is an old revision of the document!
# Bolt Integration Guide Behavior Bricks includes the integration of the usage of visual programming with Bolt to implement bricks for the behavior trees. In this tutorial, a similar behavior as implemented in the AI Random Wander tutorial made by One Wheel Studio is replicated by creating three different Behavior Bricks nodes using Bolt. The tutorial of that behavior is available in the [Ludiq official site](images:bolt:Ludiq official site).
This tutorial continues the small example created in the BT tutorials, where the player moves his avatar in the “environment” (a mere plane) using mouse clicks, and the enemy wanders around and pursues the player when he is near enough. We encourage you to follow that tutorial in the first place but, if you are impatient, its final version (and the starting point for this guide) is available in the Behavior Bricks package, under `Samples\ProgrammersQuickStartGuide\Done` folder. Obviously, you are supposed to have been loaded Behavior Bricks into a new Unity project. Refer to the download instructions in other case.
The final scene and all the contents of this Bolt integration guide is also available in the Behavior Bricks package, under `Samples\BoltIntegrationGuide\Done` folder.
## Setting-up the environment
To follow this tutorial is necessary to make the regular installation of Bolt. More information can be retrieved in [Bolt official website](https://ludiq.io/bolt/learn). Once Bolt is installed, we need to include the custom types that are implemented in Behavior Bricks, and other types that are used and are not included by default.
Custom types of Bolt can be added in unity under `Tools/Bolt/Unit Options Wizard`, in the `“Type Options”` step. The types that we have to add are: * Generic Bolt (from Behavior Bricks). * Nav Mesh Hit (from Unity).
Finally, there are other two options under `Tools/Bolt`: `“build unit options”` and `“update unit options”`. Sometimes Unity launch warnings asking for this options, so, if needed, we have to execute them.
## Setting-Up the execution with Behavior Bricks
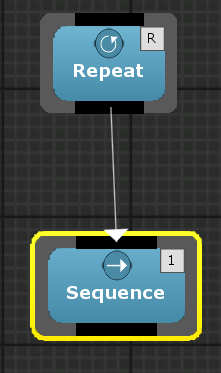
Start creating a new Behavior in the Behavior Bricks editor named, for example, `BoltWander`. This behavior will start with a `Repeat` node followed by a `Sequence node`.
The body of the behavior will be linked to this `Sequence` node and will consist in three nodes: 1. A `Bolt Generic Event` node, in charge of checking if there is a pending path and if the distance to the player is less or equal than a variable. 2. A custom node called `Get Reachable Random Point`, that searches from a random position in the floor. 3. A custom node called `Variable Wait`, that will perform a wait of N seconds depending on a input parameter.
### Bolt Generic Event: Check Pending Path The first node of the behavior is a `bolt generic event` node in the behavior tree. A `bolt generic event` is a node that does not have input parameters, so we have just to add this node as first node in the `Sequence`.
 Although the behavior does not have input parameters, we need to fill the name of the `custom event` as a constant value. This custom event name will must be the same as the `custom event` that we are going to create in Bolt. In this case, we write the name “PendingPath”.
Now, we create a Bolt `macro` with a `custom event` named “PendingPath” (or the same name that you chose before in the “custom event name” parameter). This `custom event` must also have one parameter, that represents a reference of the own Behavior Bricks node, used to call its own methods. The completed `macro` is shown below.
As mentioned before, this `macro` checks if there is not still a path pending and if the remaining distance is less or equal than a threshold (in this example, 2) and, if so, return success. Note that the parameter of the custom event is used to call the `“Return Main”` node.
Finally, we have to add a flow machine component to the enemy `gameObject`, and configure it with this recently created Bolt `macro`.
### Custom Bolt Event: Get Reachable Random Point
This node searches for a random point in the nav mesh that could be reached by the `GameObject`. The implementation of the node will be developed in a Bolt `macro`, but, before, we will create a script named `GetReachableRandomPoint` that inheritates from `GenericBolt`. This is neccessary because, this time, the Behavior Bricks node will have input parameters. Therefore, it is necessary a new class that makes that communication between Behavior Bricks and Bolt.
The code of this new class is showed above.
```csharp using Pada1.BBCore; Code attributes [Action(“Bolt/GetReachableRandomPoint”)] [Help(“Gets a random reachable point in navmesh.”)] public class GetReachableRandomPoint : GenericBolt { Behavior variables
//This variable will be used in the behavior tree
[InParam("Max Distance")]
public float maxDistance;
public override string[] GetMainArgNames() { return new string[] { "Max Distance" }; }
} ```
The variable `maxDistance` will be used in the behavior tree, so we create it and add it to the list of param names. Later, the varible we are going to add to the Blackboard must have the same name.
Next, we have to add a `Flow Machine` to the enemy and, then, create a new `macro` called, for example, `BoltGetReachableRandomPoint`. The macro generates a random vector and taking the nav mesh calculates where the GameObject must go.
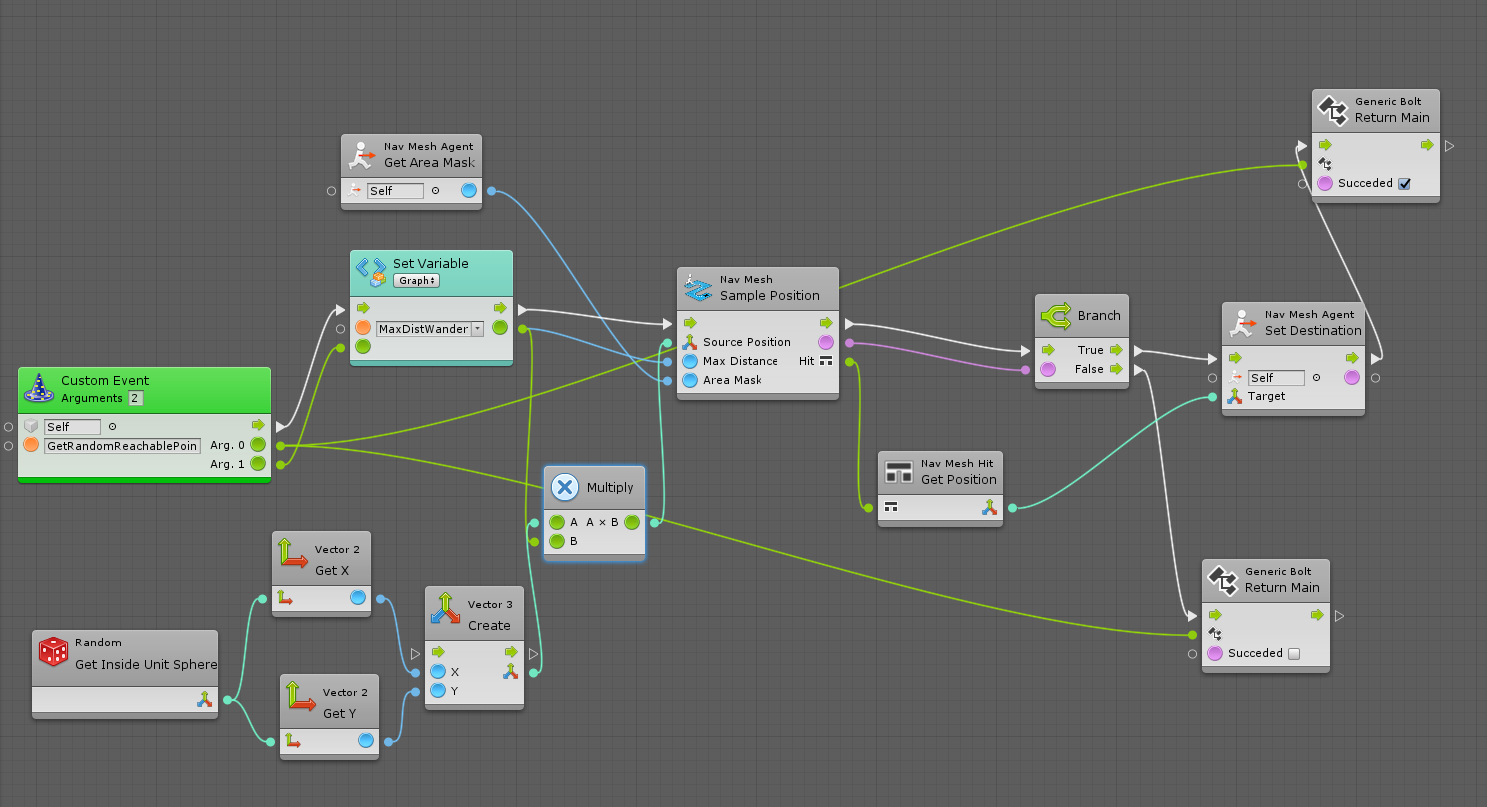
This `macro` must have a `Custom Event` module with number of arguments setted at two and the name of the event will be `GetRandomReachablePoint`. In this case, we have 2 parameters: the reference of the own Behavior Bricks node and the variable that we have just created. In addition, a `Return Main` module is necessary too. As in the previous node (Check Pending Path), it indicates the node what was the result of the execution.
Now, we have to add the new node `GetRandomReachablePoint` in the behavior tree, as in the image below.

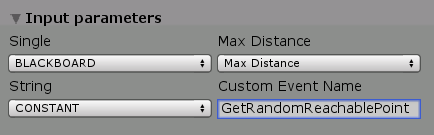
In the Behavior Bricks editor create the variable `Max Distance` (must have the same name that the string that we add to the list in the code of `GetReachableRandomPoint` previously).
The Behavior Bricks constant `Custom Event Name`, again, must have the same name as the `Custom Event` module from Bolt, in this case `Get Reachable Random Point`.
In the tab “Blackboard”, set the value of `Max Distance` as 20. In some version of Unity this doesn't work, so you must go to the GameObject component Behavior Executor and set the value there.

### Custom Bolt Event: Variable Wait
Finally, we will create a Behavior Bricks node for waiting a variable amount of time in a settable range. As in the previous node, we have to create a script. In this case, the node is called `Variable Wait`, and we will add two variables to the main list, `minTime` and `maxTime`, to limitate the range of time that the `GameObject` could wait.
```csharp using Pada1.BBCore; Code attributes [Action(“Bolt/VariableWait”)] [Help(“Wait for a range of seconds.”)] public class VariableWait : GenericBolt { Behavior variables [InParam(“Min Time”)] public float minTime; [InParam(“Max Time”)] public float maxTime;
public override string[] GetMainArgNames() { return new string[] { “Min Time”, “Max Time” }; } } ```
First, we create a Bolt `macro` `BoltVariableWait`, and we add a new `Graph Variable` called `Node` within this `macro`. This variable will have a reference to the Behavior Bricks node.

This `macro` must have a `Custom Event` module with number of arguments setted at three and the name of the event will be `VariableWait`. In this case, we have three parameters: the reference of the own Behavior Bricks node and the variables that we have just created. In addition, a`Return Main` modules is necessary (for indicate the result of the execution).
 Next, in Behavior Bricks editor we have to put the variables `Min Time` and `Max Time` as blackboard variables and have to name the `Custom Event Name` as `VariableWait`.

In the tab `Blackboard` we set the value of `Max Distance` as 20, `Min Time` as 2 and `Max Time` as 4.  In some versions of Unity, default values do not work, so you have to put this values in the `Behavior Executor` component as in the image.

Finally, add this new node to the Behavior Tree.
At this moment, the behavior should work properly. Nevertheless, if it is not working, make sure that there is a valid navmesh created, and the agents that use it have the component `nav mesh agent`.