Table of Contents
ML-Agents Integration Guide
Behavior Bricks includes the integration of the usage of ML-Agents in the behaviors created through its behavior trees. In this tutorial, we will show how to integrate ML-Agents with Behavior Bricks. We will use an existing node for using ML-Agents in our project. This node, in this case, will execute a pre-trained reinforcement learning shooting behavior in a part of our behavior tree. As we will see at the end of this guide, this node can be used to train a model too.
This tutorial continues the small example created in the BT tutorials, where the player moves his avatar in the “environment” (a mere plane) using mouse clicks, and the enemy wanders around and pursues the player when he is near enough. We encourage you to follow that tutorial in the first place but, if you are impatient, its final version (and the starting point for this guide) is available in the Behavior Bricks package, under Samples\ProgrammersQuickStartGuide\Done folder. Obviously, you are supposed to have been loaded Behavior Bricks into a new Unity project. Refer to the download instructions in other case.
Setting-up the environment
To start creating a new tree with a behavior trained in ML-Agents in a project that is using Behavior Bricks, it is necessary to make the regular installantion of ML-Agents. More information can be retrieved in the ML-Agents documentation. Once ML-Agents is installed, it is enough to drag the ML-Agents and Gizmos folders from ~/UnitySDK/Assets to the Unity Project tab in order to import it to the project.
First thing we are going to do is to prepare the necessary gameObject that allow us to execute a trained model using ML-Agents: an Agent.
Before creating the C# script for our agent, we have to modify the player and the enemy:
- Add to the player the tag
"Player"and aRigid Bodycomponent. - Add a cube to the enemy above the
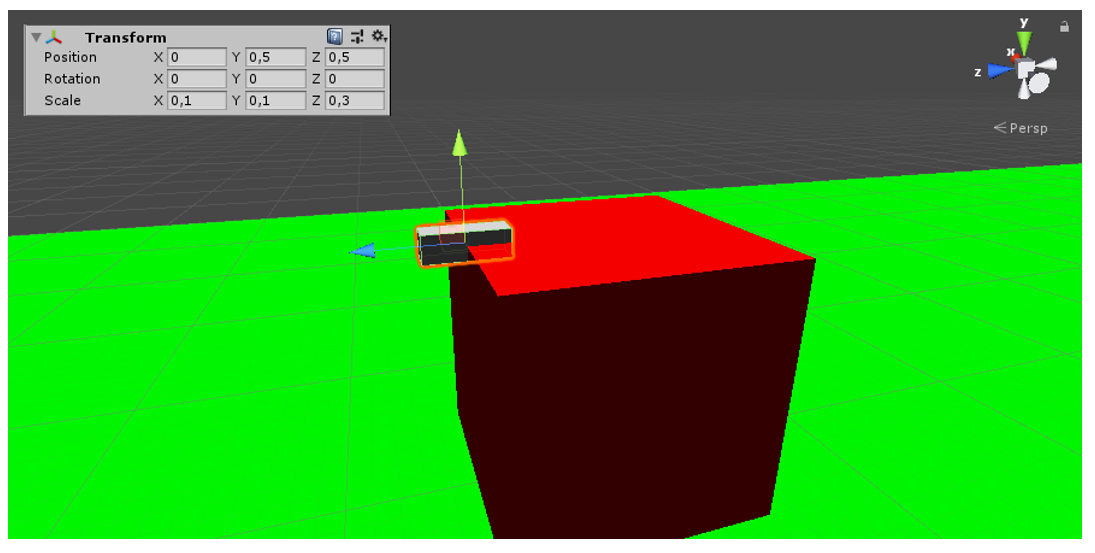
shootpointscaled to (0.1, 0.1, 0.3) at the relative position (0, 0.5, 0.5). This will tell us where the enemy is aiming.
In addition, we have to modify the way the enemy shoots in order to fit the training and the execution of the agent. Specifically, we create two new C# scripts: FiredBullet and EnemyShoot.
The script FiredBullet consists in giving intelligence to the bullet, so it can tell if the it has impacted the player, besides autodestroy passed 2 seconds (or whatever the time indicated by the parameter). Additionally, the bullet has information about its creator, which will be used for knowing who to inform of the impact. Therefore, we have to add the following C# script to the Bullet prefab, after removing the script used in previous tutorials.
	using UnityEngine;

	using MLAgents;

	public class FiredBullet : MonoBehaviour
	{
	    // Autodestruction time
	    public float autodestroySeconds = 2.0f;

	    // Creator/shooter of the bullet
	    private GameObject creator;

	    // When the bullets hits
	    private void OnCollisionEnter(Collision collision)
	    {
	        // If the bullet hits the player
	        if (collision.gameObject.tag == "Player")
	        {
	            if (creator.GetComponent<Agent>())
	            {
	                creator.GetComponent<Agent>().SendMessage("SetImpacted");
	                Destroy(gameObject);
	            }
	        }
	    }

	    // Set creator of the bullet
	    public void SetCreator(GameObject creator)
	    {
	        this.creator = creator;
	    }

	    // Autodestroys the bullet once autodestruction time is passed
	    void Start()
	    {
	        Destroy(this.gameObject, autodestroySeconds);
	    }
	}
The code should be self-explanatory, but we have to note several things:
- We have to import
MLAgentsto get the component Agent of thegameObjectimpacted, that will be our player. - We send a message to this component, calling a method
SetImpactedto notify the bullet collision with the player. - We add a
SetCreatormethod used to store the owner when the bullet is fired.
The script EnemyShoot implements the shooting capacity of the enemy agent. We create a C# script that extends Monobehaviour based on the previous script ShootOnce. This code should be self-explanatory too, and have to be added to the enemy, binding the shootpoint and the bullet prefab in the editor.
	using UnityEngine;

	public class EnemyShoot : MonoBehaviour
	{
	    // Shootpoint
	    public Transform shootPoint;
	    // Bullet
	    public GameObject bullet;
	    // Velocity of the bullet
	    public float velocity = 30.0f;
	    // Time between shoots
	    public float delay = 0.3f;

	    // If the enemy can shoot
	    private bool canShoot;
	    // Time passed since last shot
	    private float timePassed;

	    void Start()
	    {
	        if (!shootPoint)
	        {
	            shootPoint = transform.Find("ShootPoint");
	            if (!shootPoint)
	            {
	                Debug.LogWarning("Shoot point not specified. CubeShoot will not work " +
	                                 "for " + this.name);
	            }
	        }

	        // At the beginning the enemy can shoot
	        canShoot = true;
	        // No time passed
	        timePassed = 0.0f;
	    }

	    void Update()
	    {
	        // Add time passed
	        timePassed += Time.deltaTime;
	        // If it is enough time
	        if (timePassed >= delay)
	        {
	            // The enemy can shoot
	            canShoot = true;
	            // Reset timer
	            timePassed = 0.0f;
	        }
	    }

	    // Enemy shooting logic
	    public bool Shoot()
	    {
	        if (!canShoot || !shootPoint)
	            return false;

	        // Instantiate the bullet prefab.
	        GameObject newBullet = GameObject.Instantiate(
	                                    bullet, shootPoint.position,
	                                    shootPoint.rotation * bullet.transform.rotation
	                                ) as GameObject;
	        // Set creator
	        newBullet.GetComponent<FiredBullet>().SetCreator(gameObject);

	        // Give it a velocity
	        if (newBullet.GetComponent<Rigidbody>() == null)
	        {
	            // Safeguard test, although the rigid body should be provided by the
	            // prefab to set its weight.
	            newBullet.AddComponent<Rigidbody>();
	        }
	        newBullet.GetComponent<Rigidbody>().velocity = velocity * shootPoint.forward;
	        canShoot = false;
	        return true;
	    }
	}
We have to note the following points:
- There is a delay between fired bullets, so there is a time the enemy cannot shoot.
- This delay is parameterized, as well as the velocity of the bullet.
- If there is no indicated
shoot point, inStartwe try to find it. - We set the creator of the bullet when fired.
Finally, we create the C# script EnemyAgent, extending Agent class of MLAgents. We add the following code, deleting the code included by default (Start and Update methods).
	using UnityEngine;

	using MLAgents;

	public class EnemyAgent : Agent
	{
	    // INPUT PARAMETERS
	    // The player (ball)
	    public Transform target;
	    // Shootpoint
	    public Transform shootpoint;
	    // Rotation speed
	    public float maxRotationSpeed = 10;

	    // If a bullet has impacted to the target
	    private bool impacted = false;

	    // Set bool impacted to true
	    void SetImpacted()
	    {
	        impacted = true;
	    }

	    // Reset of the enemy agent
	    public override void AgentReset()
	    {
	        // The player has not been impacted
	        impacted = false;

	        if (target.transform.position.y < 0)
	        {
	            // If the player fell, zero its momentum
	            target.GetComponent<Rigidbody>().angularVelocity = Vector3.zero;
	            target.GetComponent<Rigidbody>().velocity = Vector3.zero;
	            target.transform.position = new Vector3(0, 0.5f, 0);
	        }

	        // Move the player to a new spot inside the floor
	        target.position = new Vector3(Random.value * 48 - 24, 0.5f, Random.value * 48 - 24);
	        target.GetComponent<Rigidbody>().angularVelocity = Vector3.zero;
	        target.GetComponent<Rigidbody>().velocity = Vector3.zero;
	    }

	    public override void CollectObservations()
	    {
	        // Distance vector
	        AddVectorObs(target.position.x - transform.position.x);
	        AddVectorObs(target.position.z - transform.position.z);
	        // Velocity of the player
	        AddVectorObs(target.GetComponent<Rigidbody>().velocity.x);
	        AddVectorObs(target.GetComponent<Rigidbody>().velocity.z);
	        // Forward vector of the shootpoint
	        AddVectorObs(shootpoint.forward.x);
	        AddVectorObs(shootpoint.forward.z);
	    }

	    public override void AgentAction(float[] vectorAction)
	    {
	        // Actions, size = 2
	        // Rotate
	        Vector3 actionRotate = Vector3.zero;
	        actionRotate.y = vectorAction[0] * maxRotationSpeed;
	        transform.Rotate(actionRotate);
	        // Shoot
	        if (vectorAction[1] >= 0.0)
	        {
	            if (GetComponent<EnemyShoot>().Shoot())
	            {
	                SetReward(-0.20f);
	            }
	        }
	        // Rewards
	        // A bullet impacts the target (good)
	        if (impacted)
	        {
	            SetReward(1.0f);
	            Done();
	        }
	        // The target collision with the agent (bad)
	        float distanceToTarget = Vector3.Distance(this.transform.position, target.position);
	        if (distanceToTarget < 1.42f)
	        {
	            SetReward(-1.0f);
	            Done();
	        }
	        // The target falls out of the platform (reset)
	        if (target.transform.position.y < 0)
	        {
	            Done();
	        }
	    }
	}
This class has three main methods that are overriden from the Agent class. Explaining why this methods have to be overridden and how Agent class works is out of the scope of this guide. The concrete implementation of these methods is described below.
AgentReset. Reset the scene whenDoneis called. Sets impacted variable totrueand relocates the player.CollectObservations. Gather the following information:Distance vectorbetween the player and the enemy (in the x and z axes).Velocity vectorof the player (in the x and z axes).Forward vectorof the enemy'sshootpoint(in the x and z axes).
AgentAction. Rotate the enemy, and shoot. It also resets the agent if a bullet impacts the player, the player falls of the floor and if the player collides with the enemy. Finally, this method sets the corresponding rewards, but this is out of the scope of this guide.
Setting-Up the execution with Behavior Bricks
Start creating a new behavior in the Behavior Bricks editor (Window-Behavior Bricks) called mlagentBehavior.
This behavior will be used by the enemy to wander around, when he is close to the player he follows him and, when is even closer, he shoots aiming at him. The behavior made in previous tutorials is similar, but that behavior shoots in a straight line, being steady, and our behavior will rotate to aim using ML-Agents.
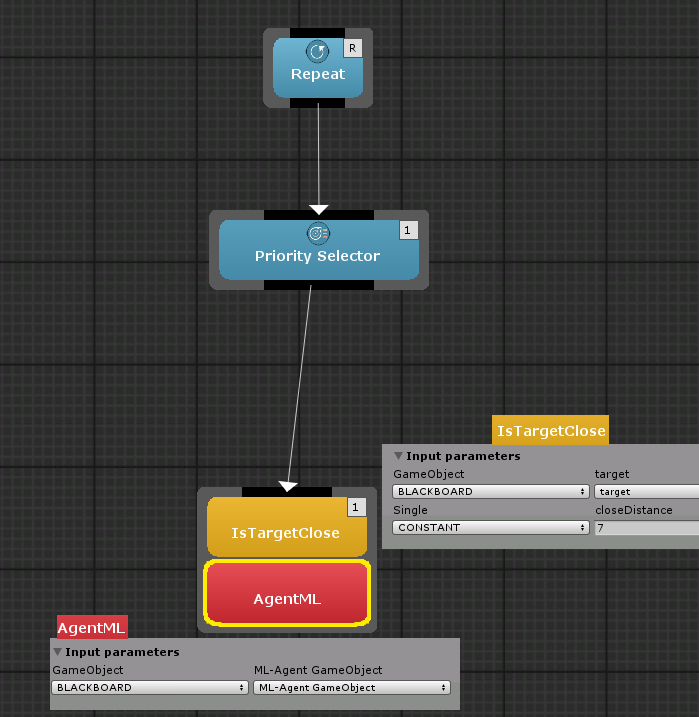
- The first node will be a
Repeat, linked to aPriority Selector. - The first branch of our
PrioritySelector will be a node calledAgentML, which use ML-Agents, with aIsTargetClosedecorator. - InIsTargetCloseset 7 as the close distance. For thetargetwe will create a blackboard input parameter calledtarget. -AgentMLhas one input parameters that we will create in the Blackboard:ML-Agent GameObject.
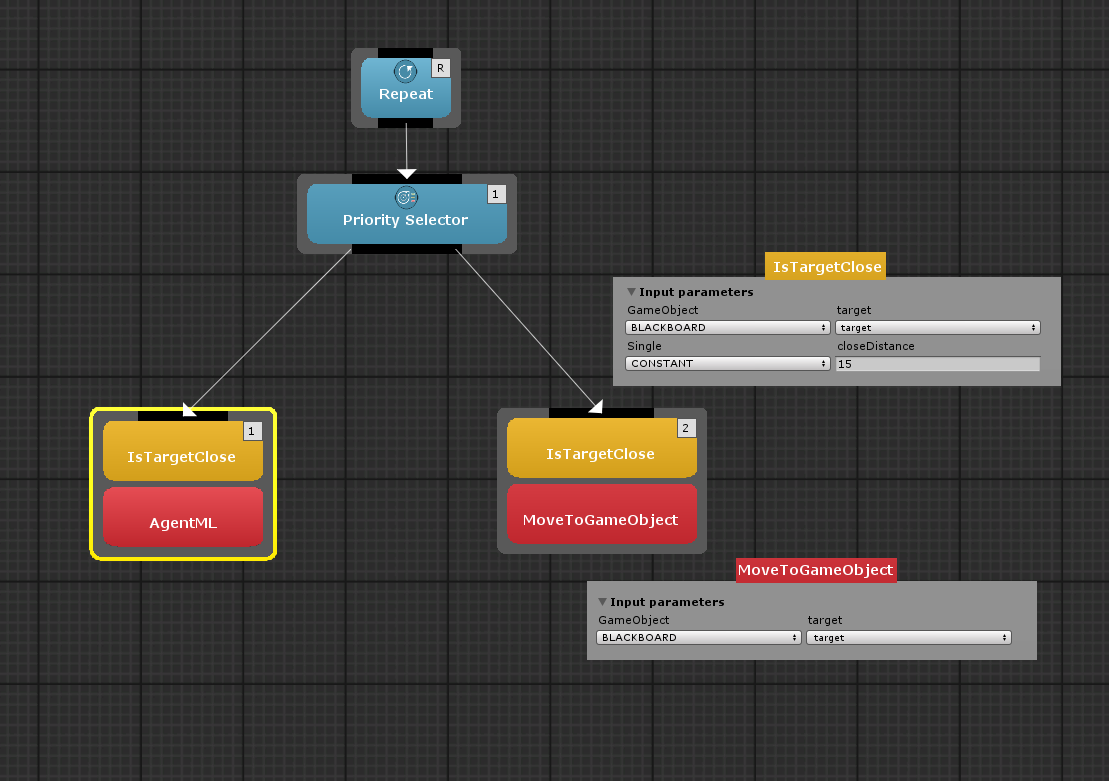
- The second branch will be
MoveToGameObjectnode with aIsTargetClosedecorator.- In
IsTargetCloseset 15 as the close distance. For thetargetwe will create a blackboard input parameter calledtarget. - In
MoveToGameObjectsettargetas thetarget.
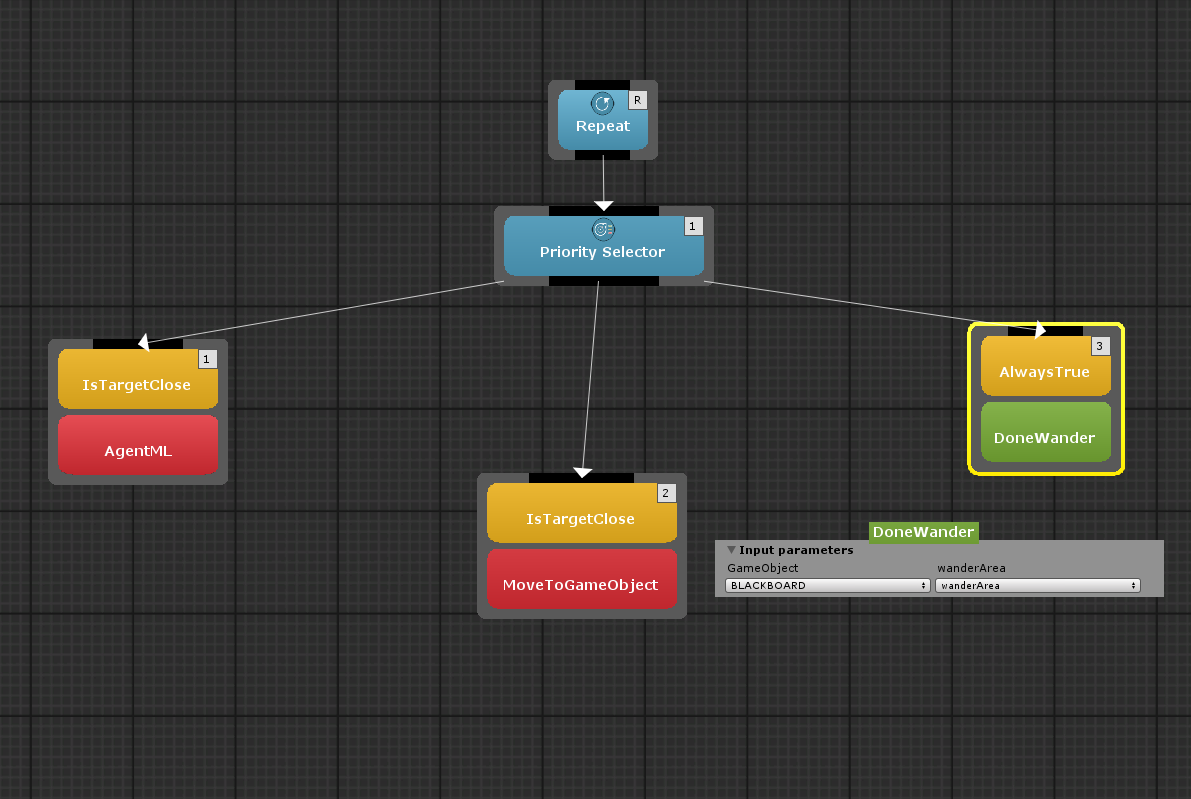
- The last branch will be a
Wandernode with aAlwaysTruedecorator.- In
Wandercreate a input parameter forwanderArea.
The behavior is prepared, so we have to add a Behavior Executor component to our Enemy GameObject and set all every parameter.
Playerfrom the scene fortarget.Enemyfrom the scene forML-Agent GameObject.Floorfrom the scene forwanderArea.
Before execute, set up the Behavior parameters as the following image.
- We set the vector observations with space size 6 because we collect 6 parameters of information:
- 2 for the distance from enemy to player vector without the Y axis.
- 2 for the player velocity vector without the Y axis.
- 2 for the enemy forward vector, "the nose", without the Y axis.
- We stacked 5 actions because the reward is given when the enemy hits the player, and this has a delay respect the action that shot the bullet. Therefore, this the reward is assign to another action, so we stacked 5 actions to have the chain of actions that results in a reward.
- We have 2 continuous actions, one to rotate and one to shoot, that is the space size.
You need to train our Enemy for having a proper behavior, but, for now, we give you a trained model that you can set in the Behavior parameters {{:wiki:agents:cubeagentlearningmodel.zip}}. It would be a good challenge to try getting a better model than this.
Training
The node used to execute ML-Agents in Behavior Bricks lets also to train a behavior inside a behavior tree. To do so, We have to follow the same procedure as indicated in ML-Agents guides.


